Today, I’d like to review how we can quickly and easily setup Security in a Planning application using the Import & Export Utilities, as well as a custom Excel VBA template.
Before anything else, I should probably explain or remind some basics about Planning security.
Why do we need to setup security and how is security defined in Hyperion?
Security whether created for a Planning or Essbase application, enables a company to control access to the Hyperion solution. Setting up security lets you protect data and prevent unauthorized users from changing or viewing data.
Security in Hyperion Planning is defined at three levels:
- Authentication: you need to have a username whether it is a native Hyperion username, or your Microsoft Active Directory single sign on.
- Provisioning Users and Groups: Hyperion application security determines user access to Hyperion products using the concept of roles. Each role possesses a different set of permissions determining the level of access the user will get. In most cases, predefined roles will be sufficient. But if needed you can create custom roles.
- Assigning access to users and groups in Hyperion Planning.
Security is maintained in Shared Services by administrators. For more information about setting up security, you can refer to the User Security Administration Guide.
If you have set up security for a Planning application before, you know you can manually assign access to groups or users to dimension members, forms, Business rules, task lists but that’s a very time consuming process. The other way is to import it all at once using a text file that will need to be named SecFile.txt and the ImportSecurity utility.
Now the trick is to setup that SecFile.txt the right way.
To give you some pointers about the required syntax for the SecFile.txt, you can set up security manually for a few dimension members, a few forms, form folders, task lists, business rules and use the ExportSecurity utility to generate the SecFile.txt.
ExportSecurity.cmd
The ExportSecurity.cmd is available on the Planning server. Open a command prompt, and go to the Planning utilities location (In my case C:\Oracle\Middleware\user_projects\epmsystem1\Planning\planning1)
To simply Export Security, type the below command, replace ApplicationName and UserName as desired and press enter:
ExportSecurity /A=ApplicationName,/U=UserName
You will then be asked to type in your password, then press enter.
Export process is done. In the same folder as the ExportSecurity utility, you should see a file named SecFile.txt. This text file contains all the security for the application you defined in the ExportSecurity command.
Parameters other than application name and username are available for the ExportSecurity.cmd. Just search for “Exporting Access Permissions“.
Now that you have a valid SecFile.txt, you can manually edit it or you can use a tool like the one I’m going to show you and that you can download here.
Use an Excel VBA template to set up the SecFile.txt and more.
This tool is a simple excel file with some vba behind it.
Couple notes:
- all tabs are protected to avoid users from deleting cell formulas. Password to remove the protection is: password
- Don’t delete rows or columns. if you need to delete cells, use clear cells instead.
The Hyperion Security Excel VBA template can be downloaded here. Once the file is open, use the first tab to:
- specify on which dimensions you wish to apply security
- list of users that will need to access the application (optional)
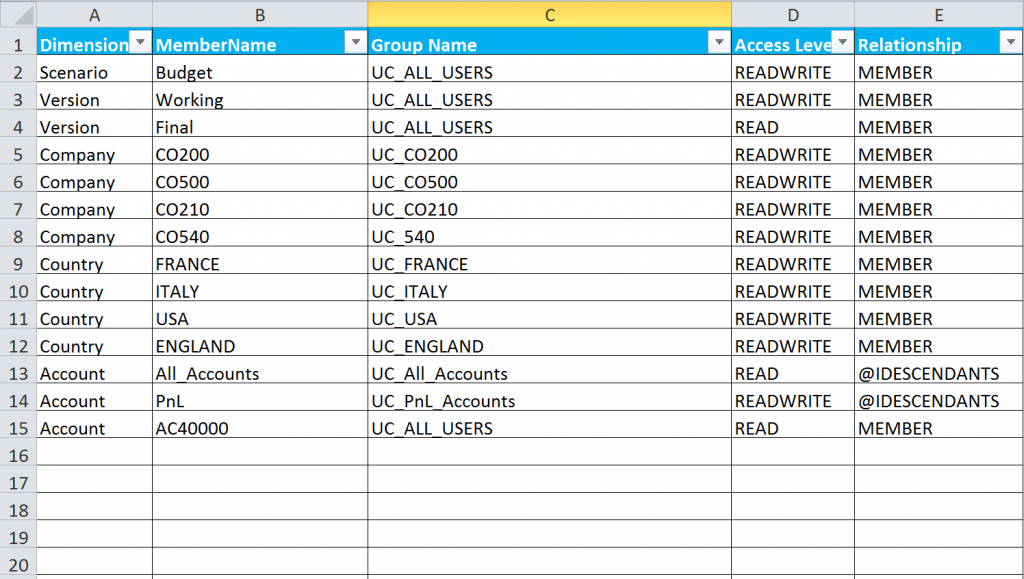
Then go to the MemberSecurity tab and start defining the dimension security you need. On each row, specify:
- the dimension
- a Member Name from that dimension
- the group Name for which you want to apply security to
- the Access level which gives you a list of options:
- None which gives no access to selected member (depends on the Relationship selected)
- READWRITE which gives write access to selected member (depends on the Relationship selected)
- READ which gives read access to selected member (depends on the Relationship selected)
- Relationship which gives you a list of options: MEMBER, @DESCENDANTS, @IDESCENDANTS, @CHILDREN or @ICHILDREN
Make sure MemberNames and Group Names are spelled right. If the groups haven’t been created yet, that is not a problem.
One note, I always set up security using groups and pretty much never assign form, rules or dimension access per user so the template is laid out for Groups, but you can enter User Name in any of the “Group Name” columns.
Then go to the FormSecurity tab and start defining the Form security you need. On each row, specify:
- the group Name
- the form or form folder name
- the Access level which gives you a list of options:
- None which gives no access to selected form or forms within the selected form folder
- READ which gives the ability to open the selected form or forms within the selected form folder
- WRITE which gives the ability to edit the selected form or forms within the selected form folder and by edit, I mean modify the layout of the form, menus and business rules attached to it. Simple users usually never have WRITE access to forms.
- the Form Security Type:
- SL_FORM if object selected is a single form
- SL_COMPOSITE if object is a composite form
- SL_FORMFOLDER if object is a form folder
- Finally, Relationship is derived from the Form Security Type of object, if the object is a folder then the Relationship is always @IDESCENDANTS, if it is a form or composite form then it is always MEMBER.
Make sure Form, Form folders and Group Names are spelled right. If the groups haven’t been created yet, that is not a problem.
Then go to the BusinessRuleSecurity tab and start defining the BR security you need. On each row, specify:
- the group Name
- the Business rule or Business rule folder name (for Business rules, I personally use Business rules folder only to set up security)
- the Access level which gives you a list of options:
- NONE which gives no access to selected rule or rules within a rule folder
- LAUNCH which gives the ability to execute the selected rule or rules within a rule folder
- Relationship which gives you a list of options: MEMBER, @DESCENDANTS or @IDESCENDANTS
- the Business Rule Security Type:
- SL_RULE if object selected is a single rule
- SL_CALCFOLDER if object selected is a rule folder
Make sure BR, BR folders and Group Names are spelled right. If the groups haven’t been created yet, that is not a problem.
Then go to the TaskListSecurity tab and start defining the Task List security you need if any. On each row, specify:
- the group Name
- the Task List Name
- the Access level which gives you a list of options:
- READWRITE which gives the ability to assign a task list
- READ which gives the ability to view a task list
- Relationship : MEMBER only
- the Task List Security Type: SL_TASKLIST
Make sure Task List names and Group Names are spelled right. If the groups haven’t been created yet, that is not a problem.
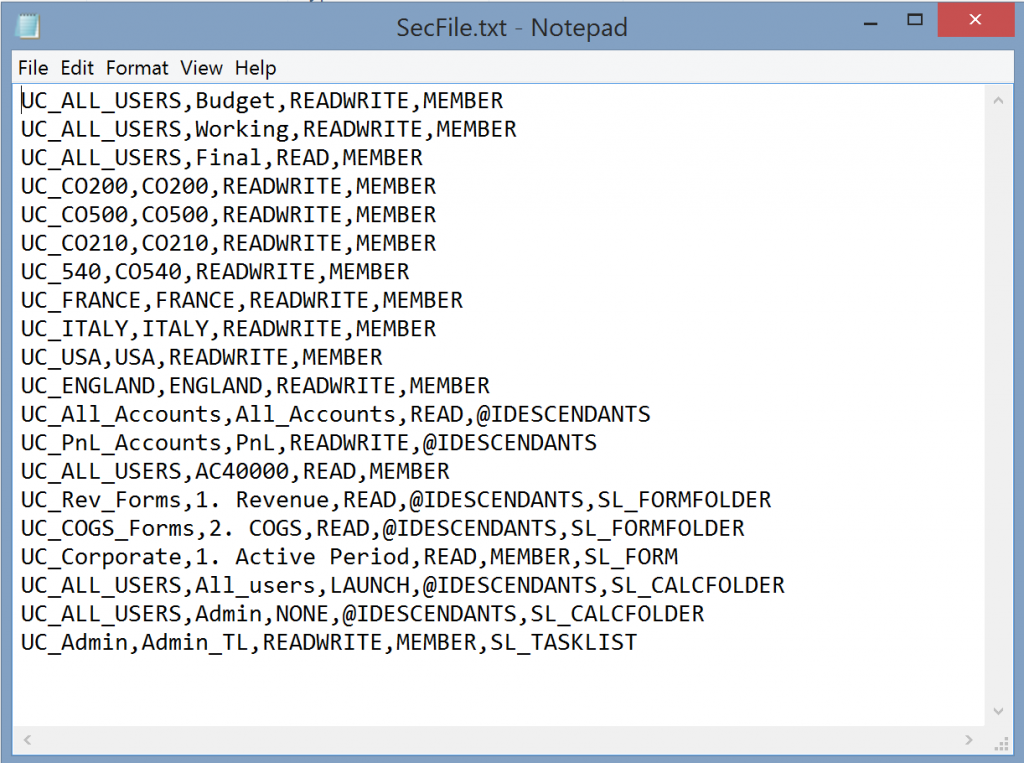
Once done, go back to the first tab: Manage and click on the Create SecFile.txt button. Once done, a SecFile text file should have been created at the same location as the Excel VBA template and should have been populated based on your inputs:
This file is ready to be imported into a Planning application. Before we go through the ImportSecurity utility, you can also use the Excel VBA template to:
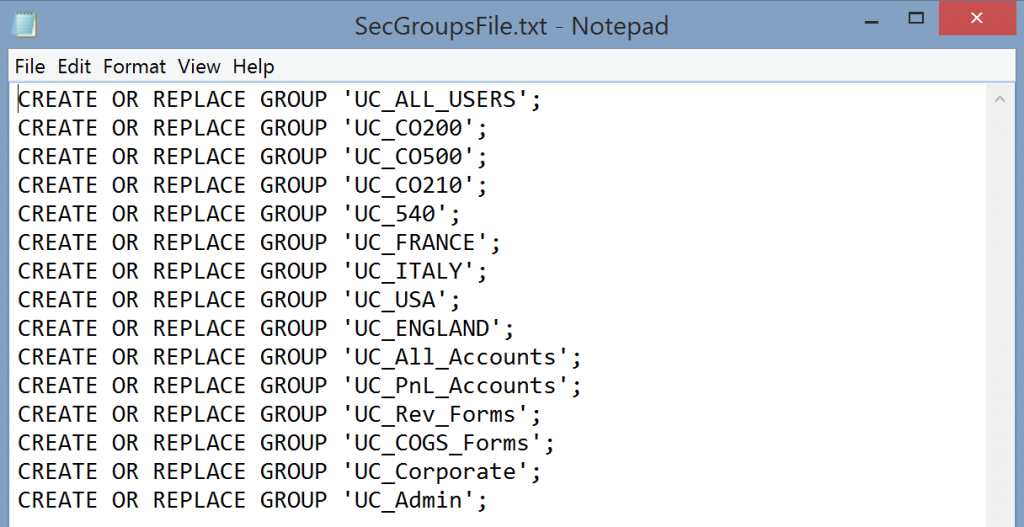
- Create groups that are being used in the SecFile by clicking on Create Security groups file in the Manage tab. A SecGroupsFile.txt will be created at the same location as the Excel VBA template. This will give you a unique list of groups. You can copy its content into the MaxL Editor in EAS and run it to create the groups.
 Add users to groups by filling the AddUsersToGroup tab and clicking on Create User Access List in the Manage tab. A UserAccessList.txt will be created at the same location as the Excel VBA template. You can copy its content into the MaxL Editor in EAS and run it to assign users to groups.
Note: if you use those methods to create groups and assign users to those groups, you will still need:
- to provision those groups with the appropriate roles manually. These groups should not be provisioned with administrative roles.
- to make sure Security filters have been refreshed
ImportSecurity.cmd
The ImportSecurity.cmd is available on the Planning server at the same location as the ExportUtility. Before running the utility, make sure the SecFile.txt that needs to be imported is in the same directory as the ImportSecurity utility.
To Import Security, type the below command, replace ApplicationName and UserName as desired, and press enter:
ImportSecurity.cmd “Application,username,SL_COMMA,,,”
ImportSecurity.cmd “Application,username,SL_COMMA,,,SL_CLEARALL”
SL_COMMA represents the delimiter used in the SecFile.txt. The default delimited is SL_COMMA.
You can use SL_CLEARALL to clear all previously set security before importing.
You will then be asked to type in your password, then press enter. If everything was done correctly, all rows should have been added to the application successfully as shown below.
Other parameters are available for the ImportSecurity.cmd. Just search for “Importing Access Permissions“.
ExportSecurity and ImportSecurity logs can be found on the Planning server under X:\Oracle\Middleware\user_projects\epmsystem1\diagnostics\logs\planning.
These Planning utilities (ExportSecurity and ImportSecurity) can also be very useful to:
- make quick massive changes to an existing Hyperion Planning application
- migrate Security between environments
- or just view what security is setup in an existing Hyperion Planning application. Vijay will show you in an upcoming post an even faster method for this)


hi, thanks for ur post.
I have exported the secfiles successfully, because i had to change app group names to something else, so now i am trying to import the file back and am using the syntax you attached but i get this error:
Thu May 12 11:21:33 CAT 2016 :: The following access not imported:-BI Essbase IAM SA,AM Statutory,READWRITE,@IDESCENDANTS due toInvalid user name found in the file.
Thu May 12 11:21:34 CAT 2016 :: The following access not imported:-BI Essbase IAM SA,Budget,READWRITE,MEMBER due toInvalid user name found in the file.
It cannot find the new group for each app dimension.please help
Hi Lesley,
Thanks for your comment. So regarding your issue, did some of the security you imported load successfully with the exception of the new groups?
Based on the details you’ve given me, I only see a few reasons why the import failed for those:
1) Did you create those new groups before importing back?
2) if those groups exist, did you provision them to have access to the application you’re trying to set the security for?
3) if 1 and 2 didn’t solve you’re issue, let me know what command you used to execute the import security utility including parameters.
Will
Hi Oscar,
I have created those new group before I could try and import them back,
I have now provisioned the groups to the application and I still get the same error:
Mon May 16 09:45:17 CAT 2016 :: The length of the string:: 1
Mon May 16 09:45:22 CAT 2016 :: Validating the Secfile.txt…
Mon May 16 09:45:29 CAT 2016 :: Logging into the application
Mon May 16 09:45:35 CAT 2016 :: Logged in successfully
Mon May 16 09:45:35 CAT 2016 :: The following access not imported:-BI Essbase IAM SA,Forms,READ,@IDESCENDANTS,SL_FORMFOLDER due toInvalid user name found in the file.
I noticed something on the group names I have created, they have spaces in between without any underscores, could that have an impact on the importing of the security file?
syntax am using is : D:\Oracle\Middleware\user_projects\epmsystem1\Planning\planning1\importsecurity “appname,username”
it then asks me for a password
Hi Lesley,
The spaces shouldn’t be an issue. But to avoid any potential problems I like to replace spces with underscores. In this case I don’t think it matters as I have replicated your error and fixed it and there is no need to remove spaces in your groups name.
Regarding the new groups you created, you need to make sure they have been provisioned with non administrator access and that you have refreshed the security filters of your application. Once done, just rerun the import security utility.
Let me know if that works now or not.
Will
Hi Will,
it works super fine, I had to refresh the security filter in my application wow.
Thanks veerrrry much, you really helped a lot.
Have a great day.
Hello,
I have issue with applying security on Report Folders, I don’t want to provide access to all the users on Root Level and would like to restrict access on each folder under Root. When I right click on Report Folder I see options(Edit Permission/ Apply Permissions to Children) to setup security. Edit Permission access would just provide access to folder and not the Reports under the Folder but Apply Permissions to Children should provide access to Folder and anything under the Folder. After applying View access and saving the changes when I close the window and go back to check the group permissions I have applied I don’t see the security I have applied.
Can you please let me know how can I apply security on each Individual Folder?
Nice…Useful.
Seem like Planning doesn’t like it if one tries to import a security file and in the file there is a special character like & on the group name it self.
Is this my opinion on have you experienced this before.
Hello,
How to enable MemberSecurity tab to have more than 700 Rows for security ? as our member level security requirement exceeding 700 rows and Create SecFile.txt button is not adding rows after Row Number 700 in SecFile. Please advise.