


A long time ago (i.e. a little bit more than a year ago) I started playing with DRM and more specifically with the new DRG features that had just been added like Calculate Name and Calculate Parent, and so I had made a quick post about their availability and how to enable them and I was planning on working on a couple additional posts on on how to use them in morde details.
Anyway, in this post I just want to show how you can leverage the DRG Calculate Name and Calculate Parent features in an actual solution.
Regarding documentation, there is some on the different objects and objects type you can leverage to calculate a node name or a node parent but when I was trying to make this work over a year ago, I found that it wasn’t very straightforward. It might be straightforward for experienced Java script developers, but I ain’t that (at least not yet).
Here is the documentation for RequestItemObject and RequestItemDetailObject.
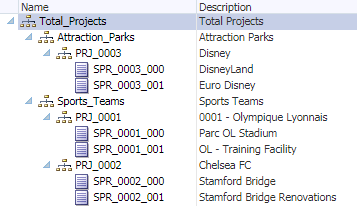
First, let’s take the below project hierarchy. My client at the time wanted their users to have the ability to create a new project (level 1) with a default sub project (level 0) at once considering that the solution needed to be as simple as possible, with a very limited number of steps, no approval required before the new members could be added to the down stream applications.
In part 1 of this post, we will go through the steps to create a workflow model with one unique task that will create a level 1 Limb project. The requirement here is that since the request once submitted by the user will be auto approved and pushed almost instantly to the downstream cube, we have to avoid any misspells i.e. we need the project code to have 4 characters max and be prefixed with PRJ_.
Let’s start by the end result.
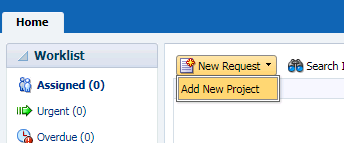
To create a new Project, user will:
- log in and select New Request
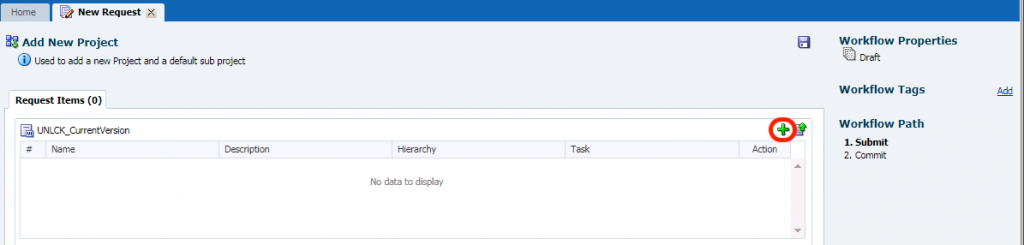
- click on Add Items (+ icon)
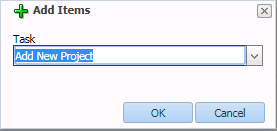
 select the Add New Project Task and click Ok

- At that point, the user can finally:
- type a project code (we gave the user a hint that he should specify a 4 digit project code)
- select the parent node under which the new project will be created
- enter a description for the new node
- As you can see the Name (i.e. Node name) to be created is greyed out as we are using the Calculate Name feature in this example.
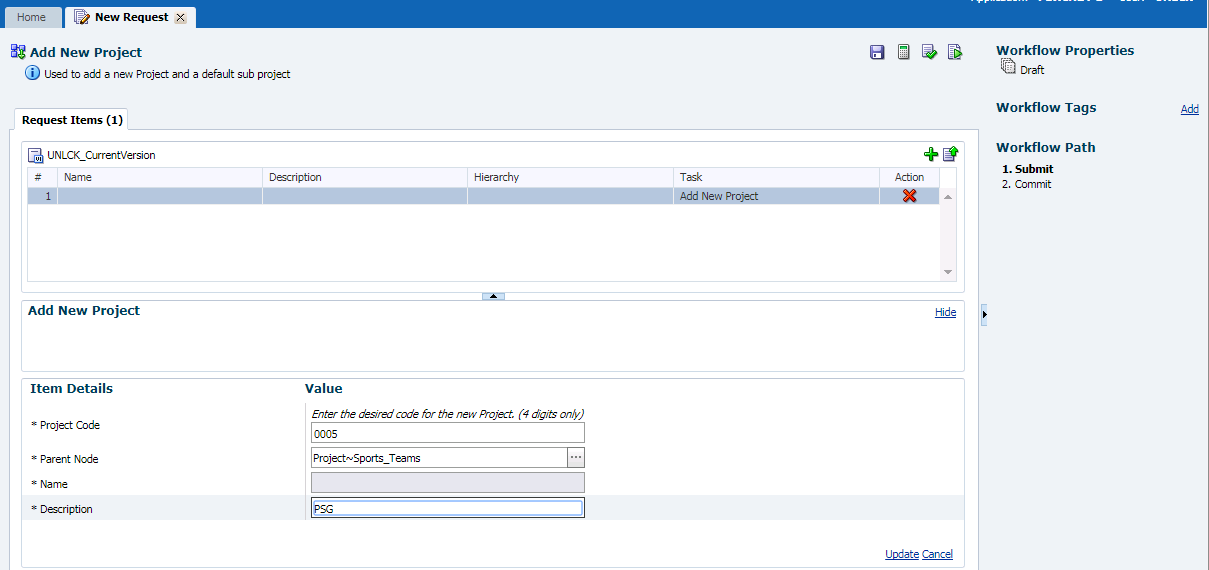
- Once the request is filled out, user can decide to click on any of the 4 icons =>

- The Floppy Disk will just save the request
- The calculator will save and calculate the request which will results in the Calculation of the Name of the node to be created as seen below (PRJ_0005)
- The Check mark will save, calculate and Validate the request i.e. do the same as the calculator but run any validations attached to the Task.
- The Play icon will save, calculate, Validate and Submit the request.
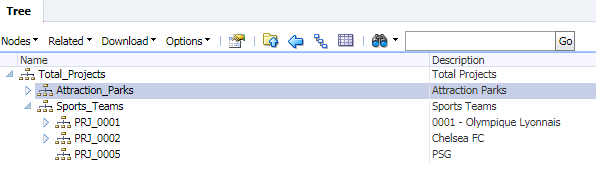
- In this case, we clicked on Submit which resulted to the below screen. Node name has been calculated, submitted and committed in one click (as we are using the ability to auto approve requests)

- If we now look at our Project Hierarchy, we can see that the new PRJ_005 project limb node has been created as expected.
How do we do this exactly?
So now, we will go through the different steps needed to create a workflow model that leverages the Calculate Name feature:
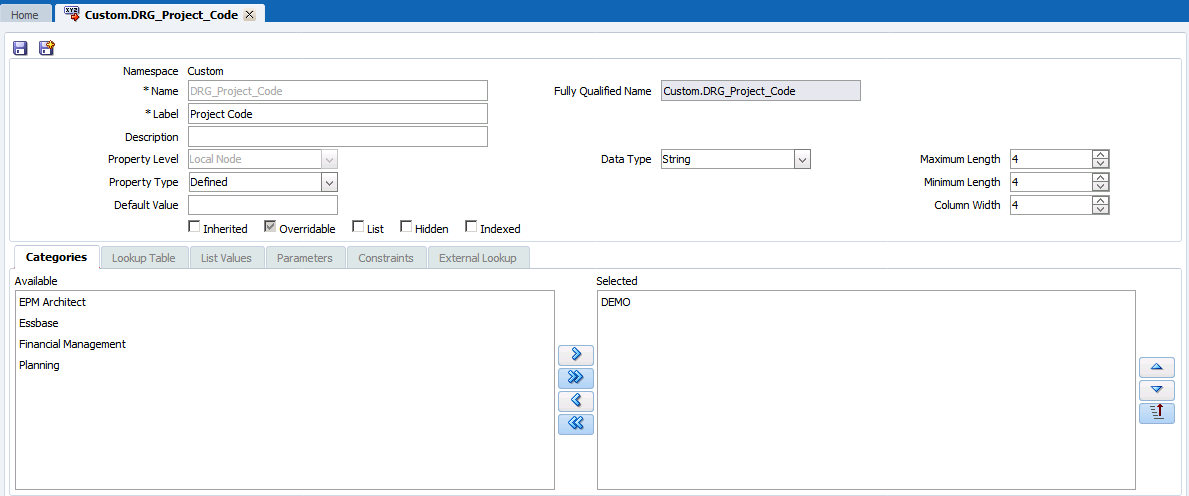
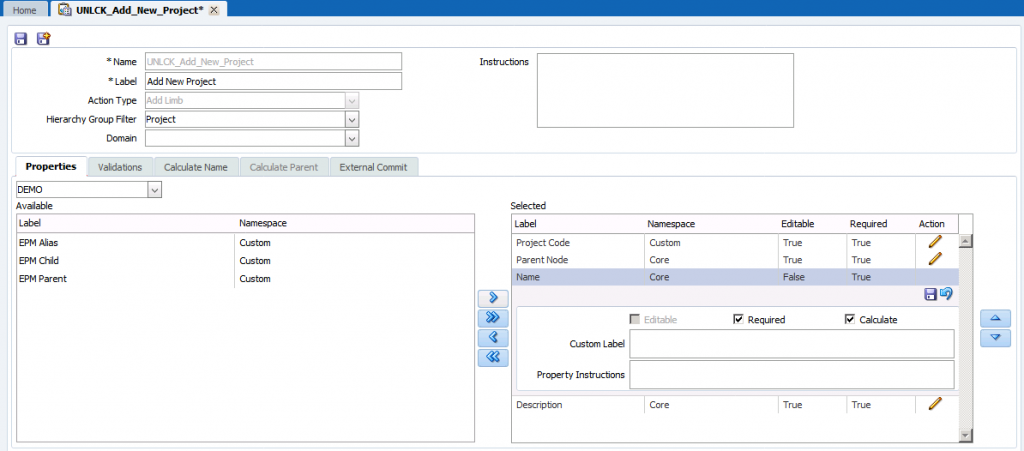
- create a new Custom Property DRG_Project_Code with a string type and we set the length to 4. Here I created a specific property for this workflow task, but if you need to create generic workflow tasks for many different hierarchies then if possible you should try to make that property as generic as possible as in the end this is just a place holder property and leverage validations instead to make sure users
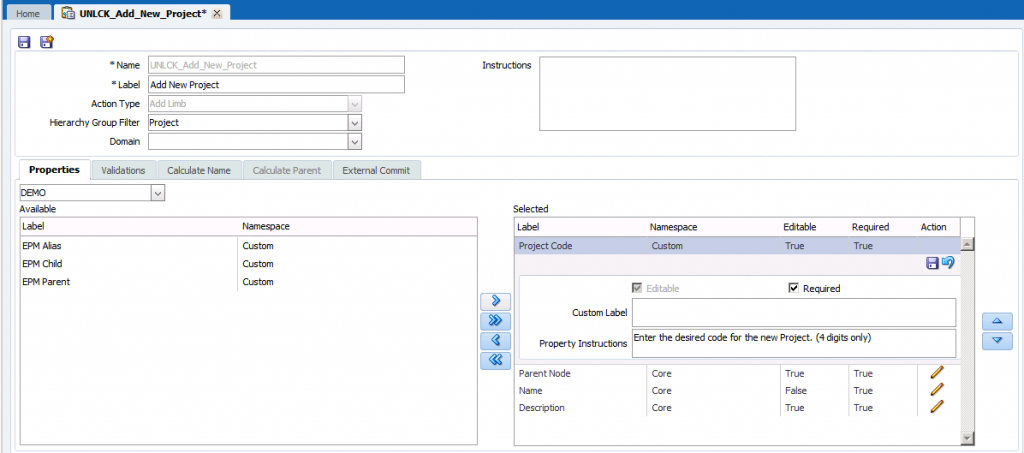
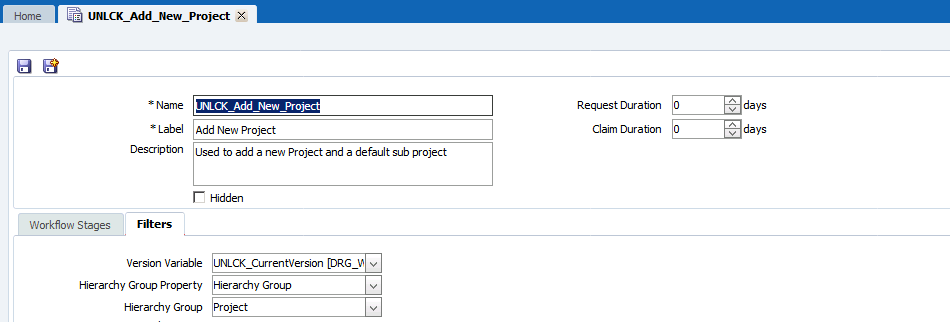
- create a new Workflow Task UNLCK_Add_New_Project
- For Action Type, I selected Add Limn because Project in my hierarchy is a Limb node. If you want to create a Leaf Node then use Add Leaf.
- In Hierarchy Group Filter, I selected the Project group filter as my project dimension is part of that Group.
- As far as properties goes:
- First, I selected the Project code property which is the label for DRG_Project_Code property created previously. I set the options for that property to Editable and Required as the Calculate Name feature will derive the node name from that property. You can add a custom label if you wish and provide instructions that the user will see when creating a Request.
- For Parent Node, I made sure that it is set to Required. (if you want to calculate the Parent node then check the Calculate box but here I am not calculating it)
- and for Name, I made sure that it was set to Required and Calculate. (as I want to calculate the node name)
- I also added description on the request.
- You can add as many properties as you need. If you need to derive the node name based on a combination of properties then make sure to add them to your workflow task.
- On the Validations tab, I am not using anything in this example, but this is where we used Validations to make sure that users were not using special characters unwanted in the downstream application, that the length of the node name was satisfying our requirements like it’s size or making sure it only had digits beside the prefix, or even making sure that users were picking as a parent the proper level as we didn’t want users to add projects as children of Total Projects for example.
- Finally, in the Calculate Name tab, this is where we define how the node name should be calculated:
|
1 2 3 4 5 6 7 8 9 10 11 12 |
var prefix = "PRJ_" var CalcName = "" var arrItemDts = requestitem.ItemDetails for (idx=0; idx < arrItemDts.length; idx++) { if( arrItemDts[idx].PropertyName =="Custom.DRG_Project_Code") { CalcName = arrItemDts[idx].Value; } } return prefix + CalcName; |
The key in the above code is the third line. That will store all the properties and values available in the request made by the user. Once that information is available, we can pull the value of the DRG_Project code property and concatenate it to the prefix. This is how we were leveraging Calculate Name but there are plenty different ways clients may want to derive a node name. All you need is making sure that those properties are part of the workflow task(s).
- During my project, we were also leveraging the External Commit option on Workflow models which was quite helpful as we needed to refresh dimensions in downstream applications and we wanted to make sure only new members were part of the dimension builds instead of all projects. This is actually very useful and if you haven’t heard of that, you should look into it.
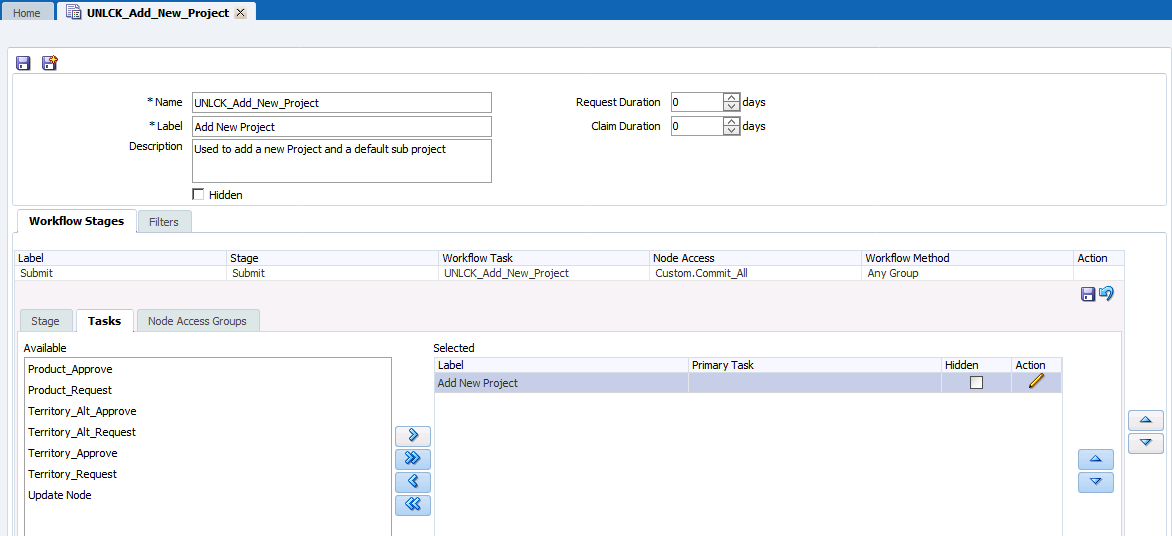
Now that we have the workflow task setup, we need a workflow model UNLCK_Add_New_Project. This is very basic, we have 2 stages:
- a Submit stage. In the Stage tab, make sure to check the Recalculate Task Properties. If It is not selected, you will have some issues when using the Calculate Name or Calculate Parent features. In the Tasks tab, select the previously created task. In the Node Access Groups tab, select the desired groups.
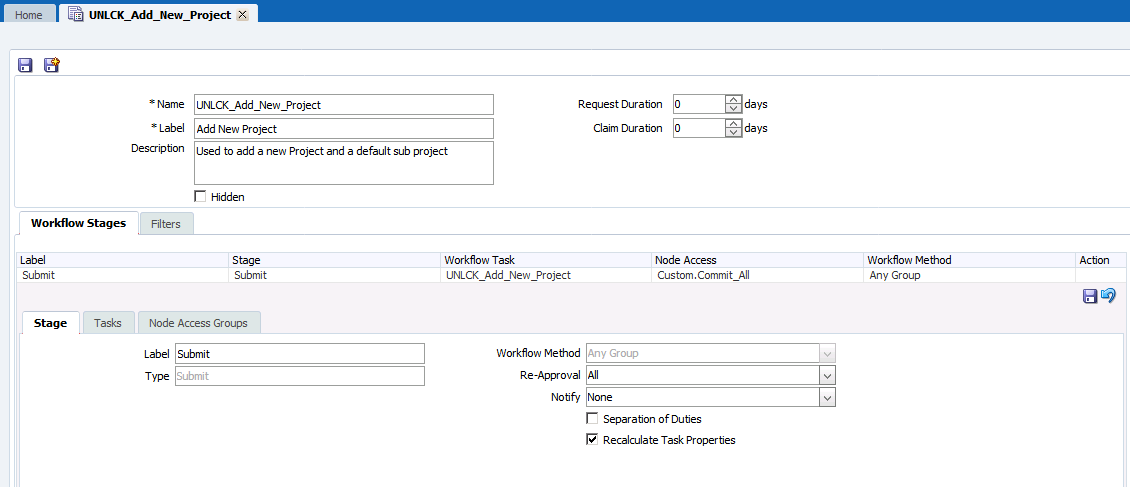
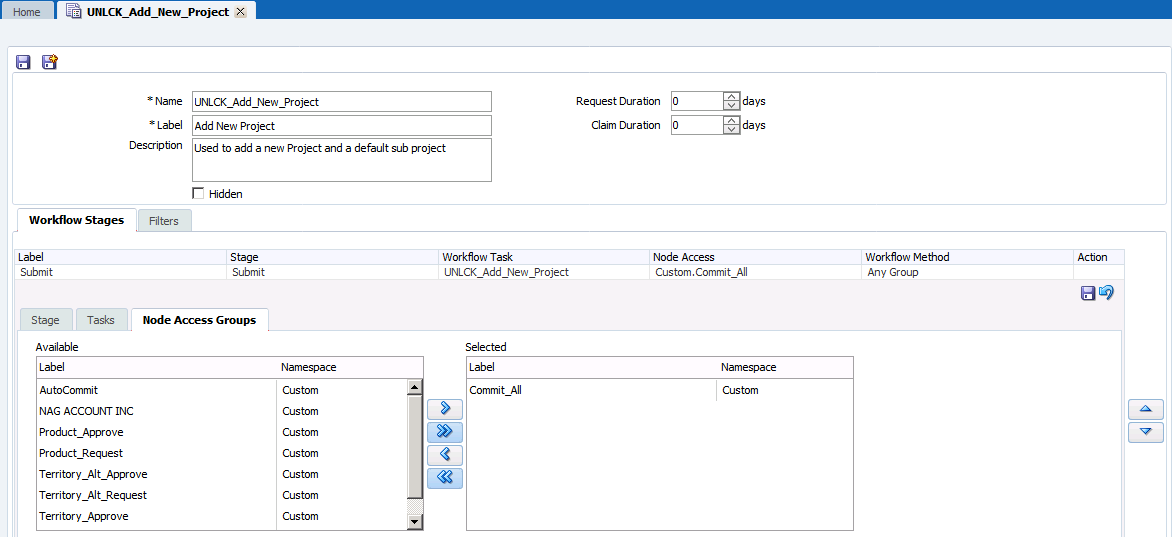
- a Commit Stage. In this stage, set it as needed. In our case, we assigned a Node Access Group that was setup as needed but had no users in it. By doing so, requests created and submitted are auto approved.
- Finally in the Filters tab of the Workflow Model, we defined as usual the desired version, Hierarchy Group Property and Hierarchy Group.
I hope this was useful. I know my clients liked the simplicity of the workflow models and this was due heavily to those new (at the time) Calculate Name and Calculate Parent features.
In Part 2, I will go a little further, and I will show how to create a level 1 project and its default level 0 subproject in one unique model with 2 tasks without adding any additional steps to the end users. Finally in Part 3, I will explain how you can test your code for the Calculate Name and Calculate Parent feature as that also was not very straight forward (at least not at first). Hopefully those next posts won’t take a year.
Thank you! Can you use RequestObject, RequestItemObject, and RequestItemDetailObject outside Calculate Name and Parent ? I would like to use these objects in a PropertyDefinition, but I get an error when I try to reference the requestitem object (ReferenceError: requestitem is not defined)
Hi Janette, I think I opened an SR for this a while back and they had said that this is not supported at least at the time. You should open a ticket with Oracle if you haven’t done so already to confirm. That would definitely be very helpful.