Now we’ve all been in situations where we’ve perform a lot of updates in an environment, let’s call it PROD and we need to perform a migration of only the objects (hierarchies, nodes, property values etc.) that changed, from that environment to, let’s say, DEV. In other words, we need a “delta” script. Since we do not currently have the ability to do LCM exports for DRM (maybe one day, Oracle?), we have to find another option. DRM’s transaction history, of course captures all this detail and more, but how do we efficiently use that information?
But, before we start, we probably need some suitable migration music. And, I need to do a shout out to my boys from back home.
This post will show how to query Transaction History and then generate an action script file from DRM which can be used for performing these partial migrations.
- From the navigation panel on the left in DRM, click on Script.
- Select Transaction Log from the Source Type drop down list.
- Select the version that you currently use on the Version dropdown. If you wish to choose specific hierarchies, just select the correct hierarchy from the Hierarchies selection.
- Go to the Filters tab and select Levels. Note that you can of course choose to migrate changes made by a particular user(s) by making selections in the Users box; or even changes made to particular properties if you so wish by making selections in the Properties box. Leave these unselected if you wish to migrate changes from all users and for all properties.
- Select Core level and move it to the right using the arrow and then hit OK.
- Select a date From which you want to include changes in the script and Un-Check Filter to Current Session. This lets you extract the changes made in your current session. Typically, you would Un-Check this option.
The Max Records option will limit the number of rows returned from the transaction log which could result in an incomplete listing of transactions. You will have to play with the number of records depending on your setup.
- Now, select the Load button and you will see the actions that were performed in the said time frame. Notice that you can see the usual action names as you would from a normal action script.
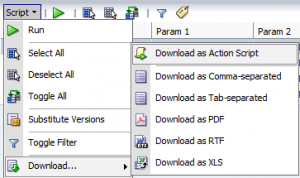
- Review the changes in the summary table below and then go to Script > Download > Download as Action Script.
Note that there is also a cool option called Substitute Versions which you might want to use in case version names are different between environments.
- Save the file to a location on your machine. Now, you can log in to the target environment and just run the extracted action script on the target application.
As you can see, it is a simple process to perform these types of partial migrations between DRM environments.


Thanks Vijay.. your posts on DRM Partial Migrations has been really helpful and insightful. One question I have is on your last point which says ‘to log in to the target environment and just run the extracted action script’ – this is where I am stuck. I am not sure if I can already run the extracted file from DEV in the target application?
Hi Taiye,
Thanks. If the version names are the same in the target environment, then on the target DRM application, you can go to Script, load the action script file and run it. That should bring along the changes for that period.